Exploring the Cute Ghost 3D Print Model: A Fun and Creative Project for All
Welcome to the world of 3D printing, where creativity meets technology! Today, we're going to dive into a charming and engaging project: the Cute Ghost 3D Print Model. This model is not just a fun addition to your 3D printing collection but also a great way to learn more about the intricacies of 3D printing and assembly. Let's explore its features, how to print it, and why it's a fantastic choice for both beginners and experienced 3D printing enthusiasts.
Understanding the Cute Ghost 3D Print Model
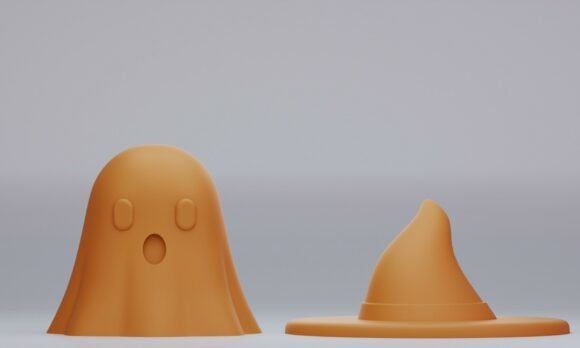
The Cute Ghost 3D Print Model is a delightful, small-scale 3D printable figure that comes in two parts: the ghost body and the hat. This design allows for easy assembly and customization, making it a perfect project for those who are new to 3D printing or looking to expand their skills.
Dimensions and Specifications
- Ghost Body: X 5.39 cm x Y 5.53 cm x Z 4.7 cm
- Hat: X 7.06 cm x Y 7.06 cm x Z 3.29 cm
These dimensions make the model compact and ideal for display on a desk, shelf, or as a decorative item in any room. The size also makes it a manageable print job, even for smaller 3D printers.
Printing the Cute Ghost Model
To ensure a successful print, here are the recommended settings and materials for the Cute Ghost 3D Print Model:
Materials and File Formats
- File Formats: STL, 3mf
- Material: Esun ePLA Matte
The use of Esun ePLA Matte filament provides a smooth, matte finish that enhances the overall aesthetic of the model. This material is also eco-friendly and easy to work with, making it a great choice for this project.
Printing Settings
- Printer: Bambu Lab A1 Mini
- Nozzle Size: 0.4 mm
- Wall Loops: 3
- Sparse Infill: 15%
- Layer Height: 0.16 mm
- Supports: Required for the Hat
These settings are optimized for the Bambu Lab A1 Mini, ensuring that the model prints smoothly and with high detail. The support for the hat is necessary to maintain its shape and structure during the printing process.
Assembling the Cute Ghost Model
Once you have printed both parts of the Cute Ghost Model, it's time to assemble them. Here’s a step-by-step guide to help you through the process:
- Prepare the Parts: Carefully remove the printed parts from the build plate and clean off any excess filament or support structures.
- Align the Parts: Place the ghost body on a flat surface and align the hat on top. Ensure that the hat sits securely and is centered on the ghost body.
- Apply Glue: Use a small amount of strong adhesive, such as super glue or epoxy, to attach the hat to the ghost body. Apply the glue around the edges where the hat and body meet.
- Allow to Dry: Let the glue dry completely according to the manufacturer's instructions. This ensures a strong and durable bond between the parts.
With these steps, you will have a beautifully assembled Cute Ghost 3D Print Model ready for display!
Practical Applications and Creative Uses
The Cute Ghost 3D Print Model is not just a fun project; it also has practical and creative applications:
- Decorative Item: Use it as a Halloween decoration or a year-round quirky addition to your home decor.
- Gift Idea: Print and assemble multiple models to give as unique, handmade gifts to friends and family.
- Educational Tool: Incorporate it into educational settings to teach students about 3D printing, assembly, and basic engineering principles.
Whether you're a hobbyist, a teacher, or someone looking to add a touch of creativity to your space, the Cute Ghost 3D Print Model is a versatile and enjoyable project.
Common Misunderstandings and Tips
Here are some common misunderstandings and tips to help you achieve the best results with your Cute Ghost 3D Print Model:
- Print Quality: Ensure your printer is well-calibrated and the bed is level to avoid issues like warping or poor adhesion.
- Material Choice: While Esun ePLA Matte is recommended, feel free to experiment with other filaments to achieve different textures and finishes.
- Support Structures: Always check and adjust the support settings in your slicing software to ensure the hat prints correctly without compromising the final look.
By following these tips, you can avoid common pitfalls and create a high-quality, visually appealing Cute Ghost 3D Print Model.
Conclusion
The Cute Ghost 3D Print Model is a wonderful project that combines creativity, technology, and a bit of fun. Whether you're a beginner or an experienced 3D printing enthusiast, this model offers a great opportunity to enhance your skills and create something truly unique. So, grab your 3D printer, load up the files, and get ready to bring this adorable ghost to life!